What Does This Article Cover?
This article describes one option for exchanging data between HighByte Intelligence Hub and the Mendix low-code application platform. Multiple integration approaches exist between Intelligence Hub and Mendix, depending on whether data flows from devices to Mendix or from Mendix to Intelligence Hub. This article focuses on sending REST requests to Mendix from Intelligence Hub. It assumes the reader has familiarity with both.
What is Mendix?
Mendix is a low-code platform designed to rapidly build, deploy, and manage enterprise-grade web and mobile applications. Applications built in Mendix can integrate with external systems and data sources through REST and OData APIs, making it a strong fit for connecting industrial data pipelines developed in HighByte Intelligence Hub.
Configuring Mendix REST endpoints
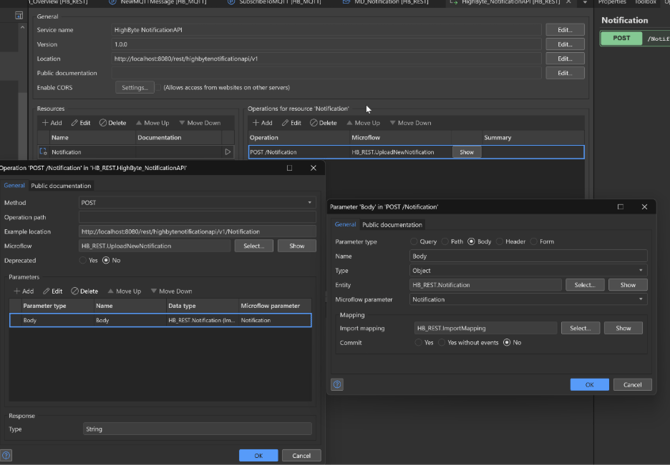
- Create a new Published REST API
- Make a POST API using a BODY input parameter, use an Import mapping with a sample JSON structure to map it to your model.
- This JSON structure will be used in Highbyte to call the API. This can contain any values, as we control both the sending and the receiving side.
Configuring Intelligence Hub REST Client
Refer to this article on setting up REST Client connector.
- In HighByte, create a new ‘REST Client’ connection with your Mendix app’s base URL, for example, http://localhost:8080/
- Under Outputs, make sure to register the POST call you created earlier and register your specific endpoint (without the base URL), for example: “/rest/highbytenotificationapi/v1/Notification”
- Under Models, create a new Model that matches the format of your JSON structure.
- For the purpose of this tutorial, you can keep all the attributes as Simple with Simple Type: Any. If you have nested JSON attributes, you can create an Object and put the nested attributes under it.
- Create a new Pipeline, give it a name, and select ‘Empty pipeline’
- In the top left, click Stages and select Polled under triggers, and place it in front of the center block. This will make sure our pipeline is automatically triggered every second, which is great for testing purposes.
- From Stages, now add a Read stage, which we’ll use to load an instance.
- With the Read stage selected, use the right-hand sidebar to navigate to Instance and drag in the motor001 instance to the Reference box.
- This will load the data we need to put into our Model for the JSON output
- Next, add the Model stage after the Read and connect it with a line from the Success box to the Model.
- Under the properties for Model, select the model you created earlier in the dropdown.
- Then click Configure Attributes
- In here, you can map the values for each of the attributes you defined in the model.
- Select each one and using Javascript, you can read values from the Model we used in Read under “event.value”, for example: “return event.value.amps;”
- The ‘event’ variable refers to the previous activity, and the data that was loaded there is available under event.value.
- Use Ctrl+Spacebar to get autocomplete options and view available variables.
- As the last step in the Pipeline, we will add a Write stage
- Connect to the end of the Model stage
- Set the Write Target: use the right-hand References pane to go to Output, select the Mendix connection, and drag the Output you made earlier onto the Targets field
- Your pipeline should now be ready to use. Make sure in the PolledTrigger properties that it is Enabled, and press Save in the top right. It should start automatically, and you can see the number on the bottom-right of the PolledTrigger increase.
Next steps
You should now have a connection for making REST requests to Mendix from Intelligence Hub to send or fetch data. Please feel free to reach out with any questions by submitting a ticket in your portal. You may next want to explore how this connection can be useful with the applications you build in Mendix. Some ideas could be: to stream or queue events from the shopfloor with resilient message delivery and retry mechanics, or to fetch user inputs in the Mendix application to feed back to the shopfloor. Check out our reference articles on examples. You may also want to explore the other modes of communication depending on the data access needs.