SAML and Entra ID
Security Assertion Markup Language (SAML) is a standard that allows users to leverage an external identity provider (IdP) to access a service provider's (SP) services. For example, Microsoft Entra ID (formerly Azure Active Directory) may be used as an identity provider to provide user access to HighByte Intelligence Hub. Entra ID will maintain a directory of users and the roles they should have in Intelligence Hub, and Intelligence Hub will contain the permissions granted to each role. The communication between Intelligence Hub and Entra ID is all handed off through the user's browser, allowing this authentication method to provide access as long as a connection can be made to both systems from the user's browser. This allows a cloud-oriented organization to maintain identities in one place and still employ Intelligence Hub.
HighByte User Roles
Roles for users must be defined in HighByte Intelligence Hub. New roles may be created as necessary. These roles will ultimately need to match user roles configured for Intelligence Hub in Entra ID as discussed below. User roles are configured in the "Manage" > "Roles" menu. Defining roles is beyond the scope of this article. Guidance for creating Roles may be found on the User Guide.
intelligencehub-identityproviders.json File
The intelligencehub-identityproviders.json file must be created in appdata. This file will be created manually. More information is available in the User Guide. Internal configurations and Active Directory may also coexist with a SAML configuration. The configuration from the user guide or this article may be copy/pasted as a starting point.
It is best practice to retain a local login to Intelligence Hub in case of a network outage or security event.
The local access can be retained by keeping the "internal" value in the "providers" array. An example / starter intelligencehub-identityproviders.json file is provided below. Many 'standard' values are left in place and values that will be required are provided empty. According to needs, some of these values may still need to be adjusted.
{

  "authentication" : {
    "providers" : [ "saml2", "internal" ],
    "saml2" : {
      "sp.nameidformat" : "urn:oasis:names:tc:SAML:1.1:nameid-format:emailAddress",
      "sp.entityid" : "",
      "sp.assertion_consumer_service.url" : "http://host:port/config/login/idp",
      "idp.entityid" : "",
      "idp.single_sign_on_service.url" : "",
      "idp.single_sign_on_service.binding" : "urn:oasis:names:tc:SAML:2.0:bindings:HTTP-Redirect",
      "idp.x509cert" : "",
      "security.signature_algorithm" : "http://www.w3.org/2001/04/xmldsig-more#rsa-sha256",
      "security.digest_algorithm" : "http://www.w3.org/2001/04/xmldsig-more#rsa-sha256",
      "security.requested_authncontext" : "urn:oasis:names:tc:SAML:2.0:ac:classes:PasswordProtectedTransport",
      "security.want_assertions_signed" : false,
      "security.authnrequest_signed" : false,
      "security.want_assertions_encrypted" : false,
      "custom.roleNameAttribute" : ""
    }

  }

}
At minimum, the fields that will need to be set in intelligencehub-identityproviders.json are
- sp.entityid - How Intelligence Hub will be identified in the IdP. User-selected. Follows a URN format.
- sp.assertion_consumer_service.url - the URL for the SAML assertion to log into intelligence hub once returned from the IdP. This will be host:port/config/login/idp. For instance, if intelligence hub is installed locally using the standard port: http://localhost:45245/config/login/idp.
- idp.entityid - Unique identifier if the IdP. This will be provided when setting up the application in Entra ID.
- idp.single_sign_on_service.url - The URL the browser will reach to in order to reach the IdP. This will also be provided when setting up the application in Entra ID.
- idp.x509cert - The name of the IdP / Entra ID certificate stored in Intelligence Hub's certificate store. A representative name chosen by the user. The certificate will be generated by Entra ID, downloaded, and uploaded to Intelligence Hub over the course of this setup
- custom.roleNameAttribute - The claim that is returned from the IdP containing the identifier of the role that should be mapped to this user. This will vary depending on how roles are mapped. Generically for the process defined in this article, the value "http://schemas.microsoft.com/ws/2008/06/identity/claims/role" may suffice.
Entra ID Enterprise Application
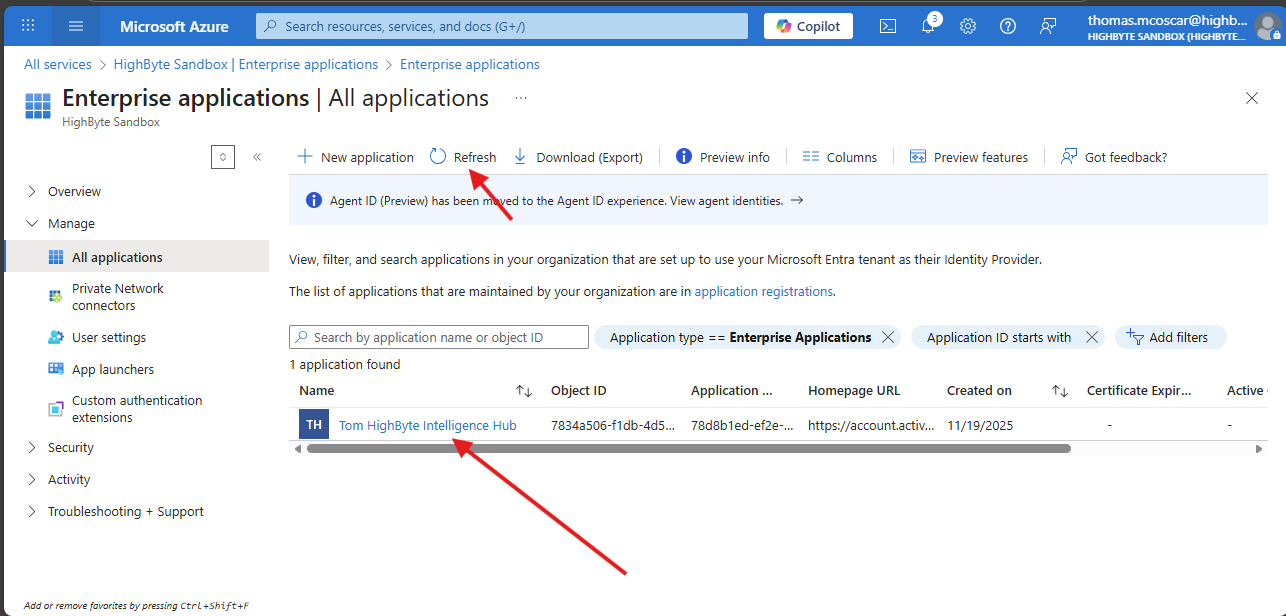
First, an enterprise application must be created in Entra ID.
- In Azure, Navigate to "Entra ID" > "Enterprise Applications" > "New Application" > "Create your own application."
- Enter Your Preferred display name on the right-side "Create your own application," select "Integrate any other application you don't find in the gallery (Non-gallery)," and press "Create."
Once the Enterprise application has been created, you should be redirected to Microsoft Entra ID > Enterprise Applications. Your application for Intelligence Hub should be visible. You may need to refresh the list.
Select your enterprise application > 2. Set up single sign on
- Select SAML
- In 1) Select Edit
- Under "Identifier (Entity ID)" select "Add identifier" and enter the same sp.entityid from above.
- Under "Reply URL (Assertion Consumer Service URL)" select "Add reply URL" and enter the same sp.assertion_consumer_service.url from above.
- remaining fields in this setup are not used by Intelligence Hub.
- Select "Save" at the top of the configuration pane.
Many more fields in your application will be populated automatically as a result of entering this configuration.
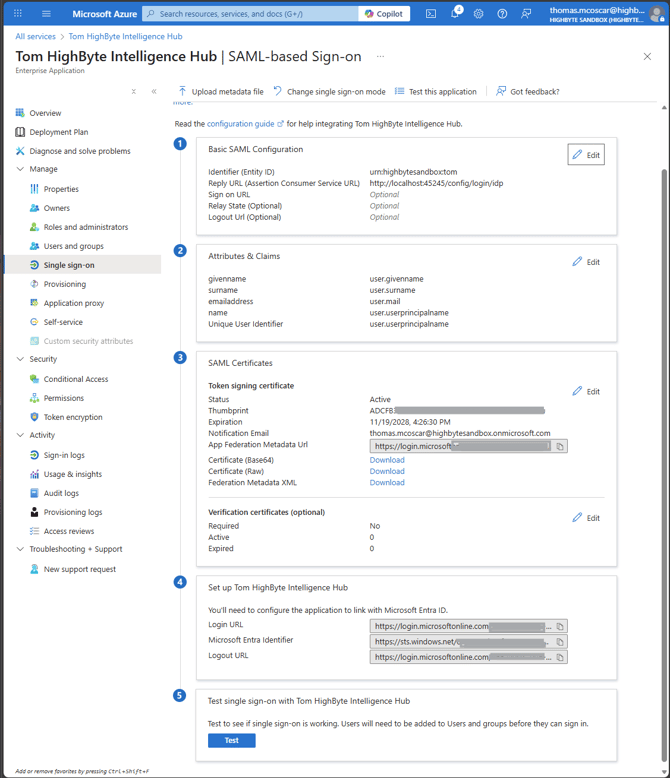
Note that in section 4, three URIs are provided. These will populate idp fields described above.
- Login URL should be saved to your intelligencehub-identityproviders.json as idp.single_sign_on_service.url.
- Microsoft Entra Identifier should be saved to your intelligencehub-identityproviders.json as idp.entityid.
- Logout URL is not used.
The last part of establishing communication to the IdP is to download the SAML certificate (Base64) from section 3.
Install the SAML Certificate to Intelligence Hub
Log into intelligence hub using internal authentication and navigate to Settings > Certificates.
- Select "New Certificate"
- Select PEM (File) from the dropdown and select "Set Import Entries" to proceed
- Alias - Enter a preferred simple name to reference the certificate.
- Certificates File - Choose File and upload the certificate downloaded from Entra ID above
- Leave "Private Key File" and "Password" empty. Select "Import"
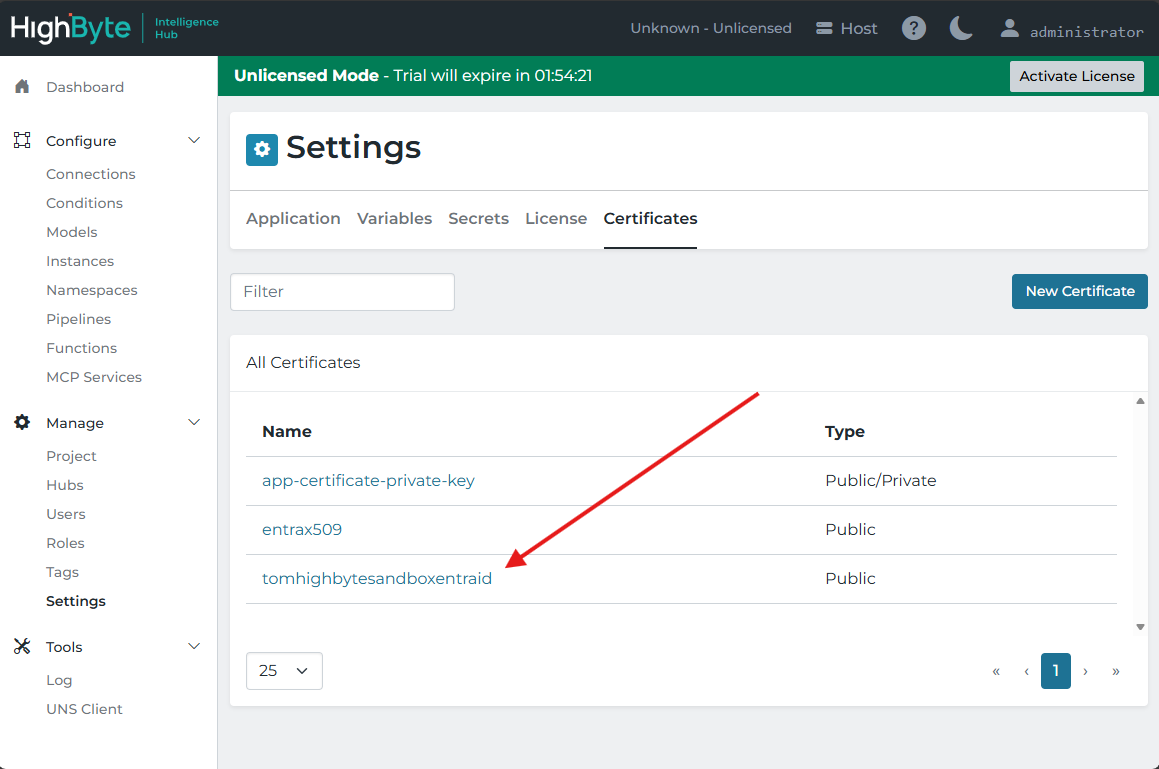
In your intelligencehub-identityproviders.json, enter the same name you gave "Alias" to your idp.x509cert defined above.
Your Intelligence hub should now be able to communicate with Entra ID (after a restart). However, they will not be authenticated. The next step will be to establish roles in this Entra ID enterprise application matching roles in HighByte Intelligence Hub and then assign those roles to a user, at which point users will be able to authenticate using Entra ID.
User Roles in Entra ID Enterprise Application
With SAML configured, App Roles must be set to select users to grant access, and define the level of access they should receive.
- Navigate to "Entra ID" > "App Registrations"
- You may need to select "View all applications in the directory" depending on your administrative level in Azure.
- Select your enterprise application by name.
- You will be brought to the App Registration menu for your Intelligence Hub application. Navigate to "Manage" > "App roles" > "Create app role."
- Enter a Display name for this app role. This display name does not functionally match any other fields, but should describe the role. It may be advantageous to match it to "Value" in the same configuration.
- "Allowed member types" is set to "Users/Groups"
- Enter a Value for this app role that matches the role configured in Intelligence Hub by exact name. Users assigned to this role will receive the permissions given to that role in Intelligence Hub. This is the field that will be functionally paired to Intelligence Hub
- Enter a description for this role for good record keeping
- Keep the box checked to "enable this app role."
- Select "Apply" to create the role.
- Now users must be assigned to the role[s] in Entra ID. Upon creating these roles, there is a helpful link in the "App registration" > "App roles" page > "How do I assign App roles" > "Enterprise Applications". This location may also be found manually.
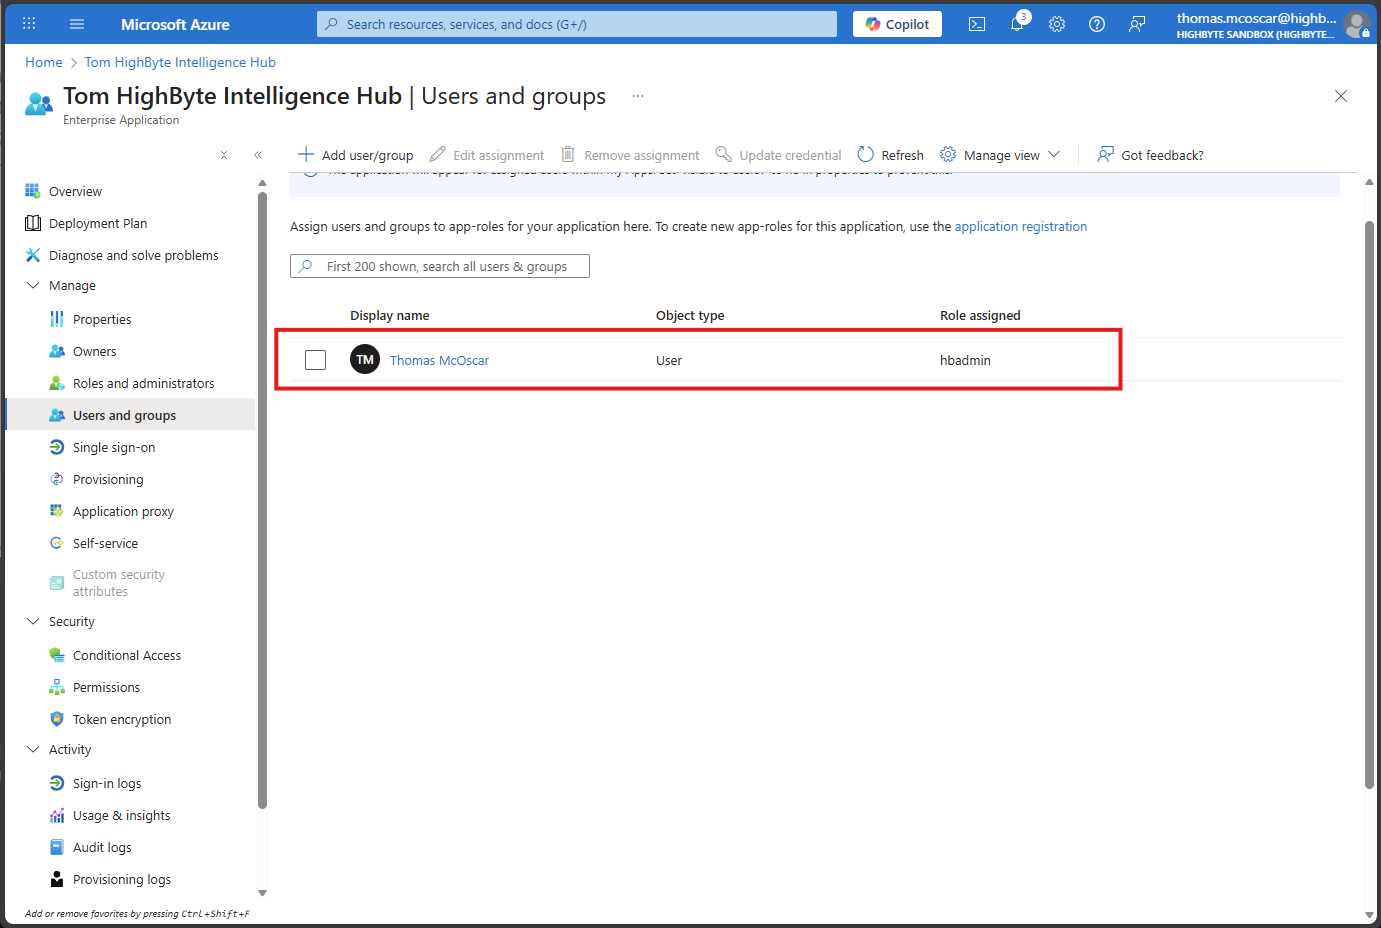
- Navigate to "Entra ID" > "Enterprise Applications" > your application > "1. Assign users and groups."
- Select "Add user/group"
- Under "Users and groups" select "None Selected" and select any user or group of users that you wish to give access to a particular role in HighByte Intelligence Hub. And press "Select" to confirm.
- Under "Select a role" select "None Selected" and choose the role that you configured in step 2 that you would like to assign to these users. And press "Select" to confirm.
- Press "Assign" to complete the configuration. Back on the "Users and groups" page to which you are returned, the added users and their associated group should now be visible.
Now the users and roles should be configured and passed from Azure Entra ID back to HighByte Intelligence Hub via the user's browser using SAML. The final step is to inform Intelligence Hub where to pick up the role identifier and fill the custom.roleNameAttribute defined above.
In the case configured in this article, the custom.roleNameAttribute will be generically set to "http://schemas.microsoft.com/ws/2008/06/identity/claims/role"
This value may seem esoteric. This is the URI under which Entra ID will store the roles associated with this user. It may be difficult to predict, but may be inspected using a troubleshooting / debugging extension as described below.
Together, these steps result in an intelligencehub-identityproviders.json file as follows (with some anonymization):
{
  "authentication" : {
    "providers" : [ "saml2", "internal" ],
    "saml2" : {
      "sp.nameidformat" : "urn:oasis:names:tc:SAML:1.1:nameid-format:emailAddress",
      "sp.entityid" : "urn:highbytesandbox:tom",
      "sp.assertion_consumer_service.url" : "http://localhost:45245/config/login/idp",
      "idp.entityid" : "https://sts.windows.net/8663a0cd-34f6----------------------/",
      "idp.single_sign_on_service.url" : "https://login.microsoftonline.com/8663a0cd-34f6-----------------------/saml2",
      "idp.single_sign_on_service.binding" : "urn:oasis:names:tc:SAML:2.0:bindings:HTTP-Redirect",
      "idp.x509cert" : "tomhighbytesandboxentraid",
      "security.signature_algorithm" : "http://www.w3.org/2001/04/xmldsig-more#rsa-sha256",
      "security.digest_algorithm" : "http://www.w3.org/2001/04/xmldsig-more#rsa-sha256",
      "security.requested_authncontext" : "urn:oasis:names:tc:SAML:2.0:ac:classes:PasswordProtectedTransport",
      "security.want_assertions_signed" : false,
      "security.authnrequest_signed" : false,
      "security.want_assertions_encrypted" : false,
      "custom.roleNameAttribute" : "http://schemas.microsoft.com/ws/2008/06/identity/claims/role"
    }
  }
}
HighByte Intelligence Hub will need to be restarted for these changes to take effect.
SAML Inspector Browser Extension
SAML by nature exchanges a fair bit of information behind the scenes, out of view of users. While this is advantageous to end users, troubleshooting setup can be difficult, as these payloads are TLS encrypted in most cases using https endpoints. However, the browser is the entity that manages these items, and browser extensions are available to make capturing and visualizing SAML payloads easy for debugging.
Many SAML inspectors are available. One such SAML inspector available for Microsoft Edge is SAML, WS-Federation and OAuth 2.0 tracer.
Custom Role Claims without a Namespace
It is possible to simplify the SAML exchange and the configuration file, and to align with certain organizational requirements by creating additional custom claims using the role attribute defined above and returning it under a user-specified, custom claim name. This will allow a single keyword to server as the custom.roleNameAttribute, which may be required or simply convenient.
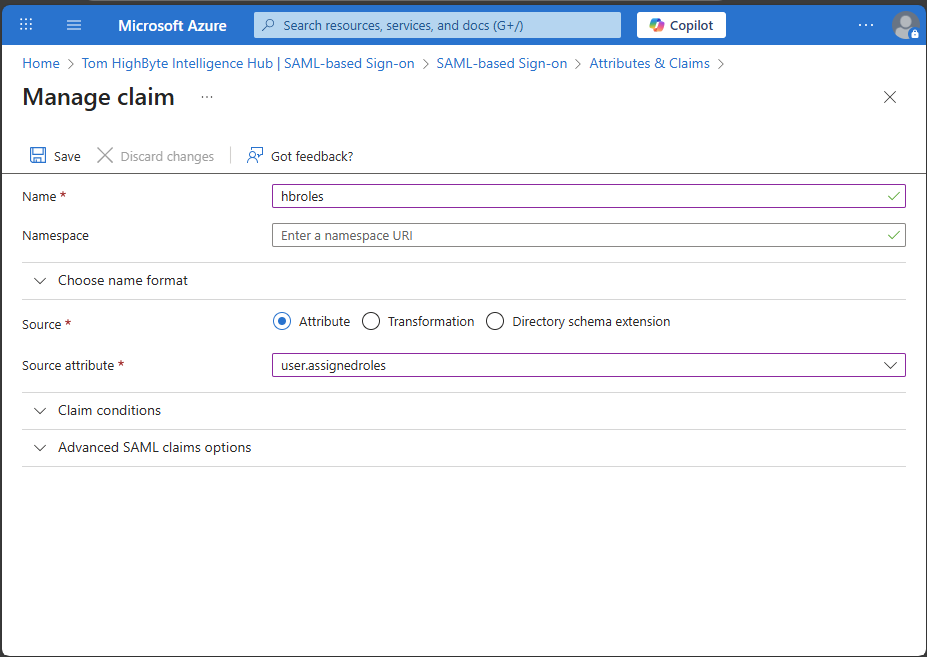
- Navigate to "Microsoft Entra ID" > "Enterprise Applications" > your application > "2. Set up single sign on" > "Edit" "2. Attributes & Claims" > "Add new claim"
- Name - Enter the "Name" as you would like the custom.roleAttributeName to appear in your SAML exchange and your intelligencehub-identityproviders.json file. This example will use "hbroles."
- Source - "Attribute"
- Source Attribute - "user.assignedroles"
- Save
The resulting "Attributes & Claims" page should look like this:
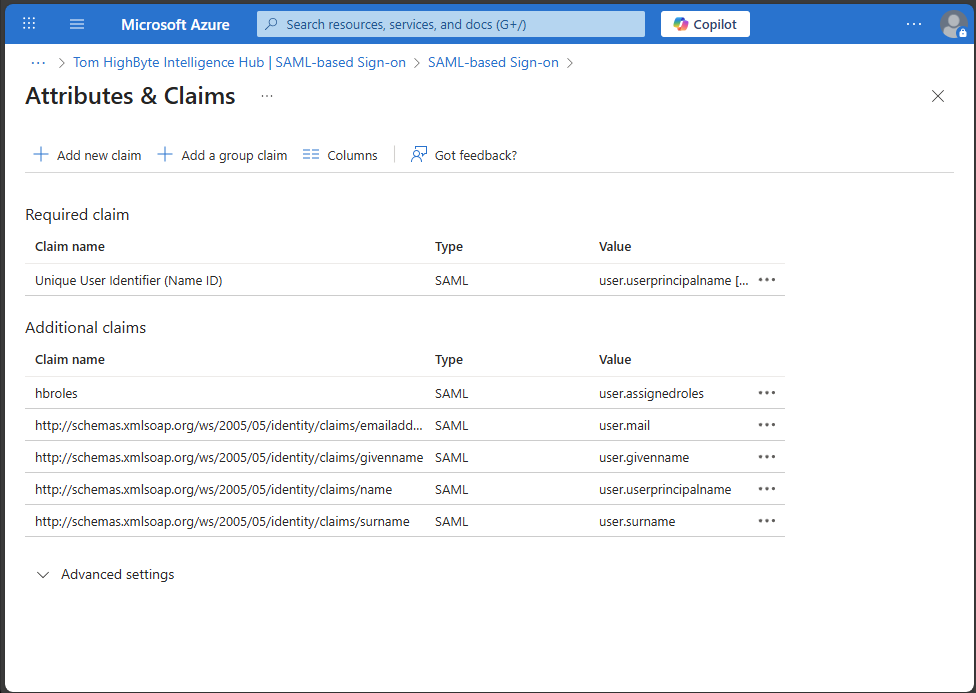
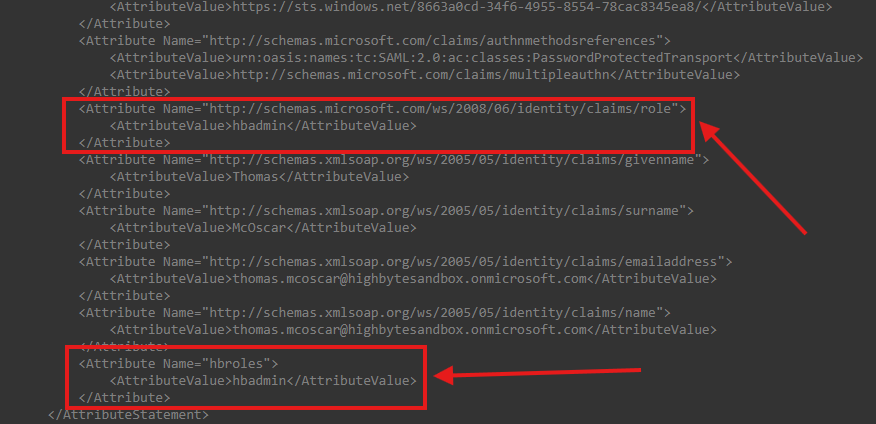
The "Name" entered for this custom claim can now be set as the custom.roleNameAttribute in intelligencehub-identityproviders.json. This additional claim will be returned along with the previous attribute. An excerpt from a SAML response from Entra ID demonstrates the two ways this result is obtained.
An alternate intelligencehub-identityproviders.json file is then available:
{
"authentication" : {
  "providers" : [ "saml2", "internal" ],
  "saml2" : {
    "sp.nameidformat" : "urn:oasis:names:tc:SAML:1.1:nameid-format:emailAddress",
    "sp.entityid" : "urn:highbytesandbox:tom",
    "sp.assertion_consumer_service.url" : "http://localhost:45245/config/login/idp",
    "idp.entityid" : "https://sts.windows.net/8663a0cd-34f6----------------------/",
    "idp.single_sign_on_service.url" : "https://login.microsoftonline.com/8663a0cd-34f6-----------------------/saml2",
    "idp.single_sign_on_service.binding" : "urn:oasis:names:tc:SAML:2.0:bindings:HTTP-Redirect",
    "idp.x509cert" : "tomhighbytesandboxentraid",
    "security.signature_algorithm" : "http://www.w3.org/2001/04/xmldsig-more#rsa-sha256",
    "security.digest_algorithm" : "http://www.w3.org/2001/04/xmldsig-more#rsa-sha256",
    "security.requested_authncontext" : "urn:oasis:names:tc:SAML:2.0:ac:classes:PasswordProtectedTransport",
    "security.want_assertions_signed" : false,
    "security.authnrequest_signed" : false,
    "security.want_assertions_encrypted" : false,
    "custom.roleNameAttribute" : "hbroles"
  }
}
}