Introduction
HighByte provides a standard Docker image on the Account Portal Downloads page that can be used to run Intelligence Hub in your preferred container engine - often Docker. While this image is generally flexible, there are certain situations where a custom image is necessary to fit specific installation environments, such as using High Availability mode, or adding additional software to the container that may be necessary. In these cases, container images are not altered from an existing image, rather, they are mostly created completely new.
This article will describe the process for creating a new container image for HighByte Intelligence Hub that can be used for either standard mode, or High Availability mode, that can then be used in a Kubernetes environment for redundancy. Other container engines are available, but this article will assume the use of the Docker container engine, and Docker Desktop for Windows computers.
Base Images
New images overwhelmingly begin using another image as a base, and then add certain resources to the image, and take a snapshot of the result to use as a new image. While this may sound contradictory to the above statement that images aren't altered, the goal here is to build up an image from a basic starting point, not to adjust any existing systems in an image. Even when the latter isn't impossible. the end result is an entirely new image, and it's simpler to conceptualize putting together pieces into a new one, rather than trying to undo anything in an existing image.
The vast majority of containers are Linux-based, but tools like Docker Desktop allow these containers to run on Windows PCs as well. The most common starting point for a Docker image is a very lightweight Linux operating system - often Alpine Linux. But, in this case, Intelligence Hub also requires a Java runtime, and Eclipse-Temurin is a Linux image that already has that Java runtime installed, so it is a natural candidate for creating an Intelligence Hub container.
The process will include starting from a base image (Eclipse Temurin), adding in some additional resources (Intelligence Hub), running a few commands to set up the environment as necessary, and then processing the result into a usable image. This process will be defined in more detail below. This process will create a Docker image based on HighByte Intelligence Hub 4.3.1, but the process will be similar for any other version.
Additional Files
First and foremost, we will need to retrieve a copy of the version of HighByte Intelligence Hub for which we intend to create a docker image. This image can be downloaded from the HighByte Account Portal Downloads page as well. Once downloaded, the zip file will be extracted. A detailed walkthrough will be available below.
In addition to the Intelligence Hub, a couple additional files will be necessary: A "Dockerfile" and a modified "start-linux.sh" script.
Dockerfile
Note: The services available on port 45345 is being transitioned to port 8885. Please update your configurations to use port 8885, as port 45345 will be discontinued with v4.4+ of Intelligence Hub.
The most important file to creating a Docker image is the 'Dockerfile.' This file is named 'Dockerfile,' and it includes all the instructions to create the image from the local files. The Dockerfile used in this example is visible below, and can be downloaded here.
FROM eclipse-temurin:21-jdk-alpine

WORKDIR /highbyte
COPY ./HighByte-Intelligence-Hub-4.3.1/appData/ /highbyte/appData
COPY ./HighByte-Intelligence-Hub-4.3.1/runtime/ /highbyte/runtime
COPY ./HighByte-Intelligence-Hub-4.3.1/configuration /highbyte/configuration

# Make script executable
RUN chmod +x /highbyte/runtime/start-linux.sh

# Default environment variables
ENV OTEL_AGENT_JAR="" \
    JAVA_OPTS="" \
    OTEL_ENDPOINT="http://localhost:4318"\
    START_MODE="Default"\
    HA_NODE="node1"\
    HA_URI="jdbc:postgresql://pgdb-service:5432/dbName?user=username&password=password"

# Suggested ports
EXPOSE 45245
EXPOSE 1885
EXPOSE 8885
EXPOSE 9001
EXPOSE 45345

# USER defines user the container will be run as.
RUN adduser highbyteuser -D
RUN chown -R highbyteuser /highbyte
USER highbyteuser

# Entrypoint runs the start script
ENTRYPOINT ["/highbyte/runtime/start-linux.sh"]
This file is best understood in pieces.
The beginning line
FROM eclipse-temurin:21-jdk-alpine
defines the starting image that will used as a base. As described above, eclipse-temurin is a linux distribution with a Java runtime pre-installed. 21-jdk-alpine is a version tag that indicates this image has a Java 21 runtime installed atop Alpine Linux. This base image does NOT need to be downloaded or stored in advance.
Java runtime version 21 may be used in version 4.3, but Intelligence Hub 4.4 and later will require at least Java runtime version 25. Newer versions of eclipse-temurin will be available.
The second block:WORKDIR /highbyteCOPY ./HighByte-Intelligence-Hub-4.3.1/appData/ /highbyte/appDataCOPY ./HighByte-Intelligence-Hub-4.3.1/runtime/ /highbyte/runtimeCOPY ./HighByte-Intelligence-Hub-4.3.1/configuration /highbyte/configuration
Sets the starting point inside the container for the COPY commands, and those copy commands copy the locally-downloaded Intelligence Hub files into the container-image-to-be.RUN chmod +x /highbyte/runtime/start-linux.sh
makes the start file executable so that Intelligence Hub can start.
This "COPY" block is also a good opportunity to include files for additional functions. Like jdbc jar files for JDBC connectors, a specialized certificate store, or npm libraries for additional functions.
The next blockENV OTEL_AGENT_JAR="" \ JAVA_OPTS="" \ OTEL_ENDPOINT="http://localhost:4318"\ START_MODE="Default"\ HA_NODE="node1"\ HA_URI="jdbc:postgresql://pgdb-service:5432/dbName?user=username&password=password"
Then defines all the expected environment variables and their default values. These will be edited (or not) by the user at runtime to set certain characteristics for the container like running in High Availability mode, or directing the runtime to certain OpenTelemetry resources.
Similarly, suggested ports are listed that define ports that should be exposed to the Intelligence Hub.EXPOSE 45245EXPOSE 1885EXPOSE 8885EXPOSE 9001 EXPOSE 45345
Lastly, a new user 'highbyteuser' is created, ownership over the Intelligence Hub files is transferred to the new user, and that users is selected to run the HighByte Intelligence Hub process.RUN adduser highbyteuser -DRUN chown -R highbyteuser /highbyteUSER highbyteuser
And then the starting process is defined for launching the container.ENTRYPOINT ["/highbyte/runtime/start-linux.sh"]This is the command that will be executed automatically when the new container launches.
start-linux.sh
The Dockerfile is crucial in creating a container, but to accomplish the goals of this container, the standard start-linux.sh script from the default download must be replaced or modified. The start-linux.sh script used in this article can be downloaded here, or observed below. Recall that this is start-linux.sh even if running in Docker on a Windows PC, because the base image we are using is actually Linux.
#!/bin/sh

cd "$(dirname "$0")" || exit 1

print_usage() {
  echo "Usage: $0 [otel|help]"
  echo "  otel [collector endpoint]: Use OpenTelemetry agent to collect metrics. Optionally specify a collector endpoint."
  echo "  help: Show this help message."
}

# Environment variables are defined by image and container creation
#OTEL_AGENT_JAR=""
#JAVA_OPTS=""
#OTEL_ENDPOINT="http://localhost:4318"

# Parse arguments manually
while [ $# -gt 0 ]; do
  case "$1" in
    otel)
      OTEL_AGENT_JAR="opentelemetry-javaagent.jar"
      if [ -n "$2" ]; then
        OTEL_ENDPOINT="$2"
        shift
      fi
      ;;
    help)
      print_usage
      exit 0
      ;;
    *)
      echo "Unknown argument: $1"
      print_usage
      exit 1
      ;;
  esac
  shift
done

OTEL_AGENT_PROPERTIES="-Dotel.exporter.otlp.endpoint=${OTEL_ENDPOINT} \
-Dotel.service.name=HighByteIntelligenceHub \
-Dotel.exporter.otlp.protocol=http/protobuf \
-Dotel.metrics.exporter=otlp \
-Dotel.logs.exporter=otlp \
-Dotel.metrics.exporter.interval=30000 \
-Dotel.traces.sampler=always_off \
-Dotel.instrumentation.enabled=false \
-Dotel.instrumentation.runtime-metrics.enabled=true \
-Dotel.instrumentation.logback-appender.enabled=false \
-Dotel.instrumentation.log4j-appender.enabled=false \
-Dotel.instrumentation.jul-appender.enabled=false \
-Dotel.instrumentation.log4j-context-data.enabled=false \
-Dotel.javaagent.extensions=com.highbyte.intelligencehub.runtime.otel \
-Dotel.javaagent.logging=application"

if [ -n "$OTEL_AGENT_JAR" ]; then
  JAVA_OPTS="$JAVA_OPTS -javaagent:lib/$OTEL_AGENT_JAR $OTEL_AGENT_PROPERTIES"
  echo "Starting HighByte Intelligence Hub with OpenTelemetry agent..."
  echo "JAVA_OPTS: $JAVA_OPTS"
fi

if [ "$START_MODE" = "HA" ]; then
  # Launch java HA Mode
  java $JAVA_OPTS -cp "intelligencehub-runtime.jar:lib/*" com.highbyte.intelligencehub.runtime.HAMain start -n $HA_NODE -j env:HA_URI || \
  (
    java $JAVA_OPTS -cp "intelligencehub-runtime.jar:lib/*" com.highbyte.intelligencehub.runtime.HAMain create -n $HA_NODE -j env:HA_URI && \
    execjava$JAVA_OPTS-cp"intelligencehub-runtime.jar:lib/*"com.highbyte.intelligencehub.runtime.HAMainstart-n$HA_NODE-jenv:HA_URI
  )
else
  exec java $JAVA_OPTS -cp "intelligencehub-runtime.jar:lib/*" com.highbyte.intelligencehub.runtime.Main start
fi
Most of these lines are unchanged from the default configuration and have largely to do with configuring OpenTelemetry. This image will not be configured specifically for OpenTelemetry, and that process is outside the scope of this article.
The notable sections are as follows:
One block of commands setting variables is commented out. the '#' character indicates a comment, meaning descriptive language can be added in for human user/reader context, but those lines will not be observed by the program assembling the container image. This lets us make some notes or 'deactivate' certain pieces of the start script.# Environment variables are defined by image and container creation#OTEL_AGENT_JAR=""#JAVA_OPTS=""#OTEL_ENDPOINT="http://localhost:4318"
These lines set environment variables in the default installation, but Docker will allow the user to set these variables elsewhere, so these lines are deactivated to avoid overwriting a user's instruction.
Near the end of the file, there is a block of code:
if [ "$START_MODE" = "HA" ]; then
# Launch java HA Mode
java $JAVA_OPTS -cp "intelligencehub-runtime.jar:lib/*" com.highbyte.intelligencehub.runtime.HAMain start -n $HA_NODE -j env:HA_URI || \
(
  java $JAVA_OPTS -cp "intelligencehub-runtime.jar:lib/*" com.highbyte.intelligencehub.runtime.HAMain create -n $HA_NODE -j env:HA_URI && \
  exec java $JAVA_OPTS -cp "intelligencehub-runtime.jar:lib/* "com.highbyte.intelligencehub.runtime.HAMain start -n $HA_NODE -j env:HA_URI
)
else
exec java $JAVA_OPTS -cp "intelligencehub-runtime.jar:lib/*" com.highbyte.intelligencehub.runtime.Main start
fi
This block checks to see if the user has set the environment variable "START_MODE" to 'HA.' If so, the container tries to join a High Availability pool if available - if not available, it creates the pool and then joins it using the info from "HA_NODE" and "HA_URI." And if the user did NOT set "START_MODE" to "HA," then the Intelligence Hub starts in standard mode.
This start-linux.sh script will replace the start-linux.sh script in the default software package at Highbyte-Intelligence-Hub-X.X.X/runtime/start-linux.sh.
Process Walkthrough for Image Creation
With the context of the above additional pieces required to create the custom Docker image, the following is a step-by-step process to create the custom image. This assumes a prior installation of Docker or Docker Desktop.
- Download Intelligence Hub from the HighByte Account Portal Downloads page.
- Extract the zip folder
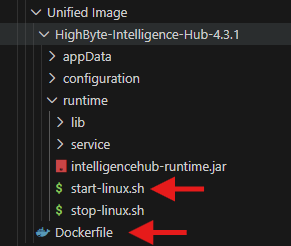
- Make note of the "inner folder" that holds
appdata,runtime, andconfigurationdirectories.
- Save the above Dockerfile into the extracted directory alongside / next to the inner folder.
- The Dockerfile should simply be named 'Dockerfile' with no extensions.
- Replace the
"inner folder"/runtime/start-linux.shwith the start-linux.sh script defined above.- At this point, it is not necessary, but beneficial to also remove start-windows.bat, start-macos.sh, stop-windows.bat, and stop-macos.sh.
- Open Windows Command Prompt or PowerShell and navigate to the "outer folder" - the directory in which you have stored the "inner folder" and the Dockerfile.
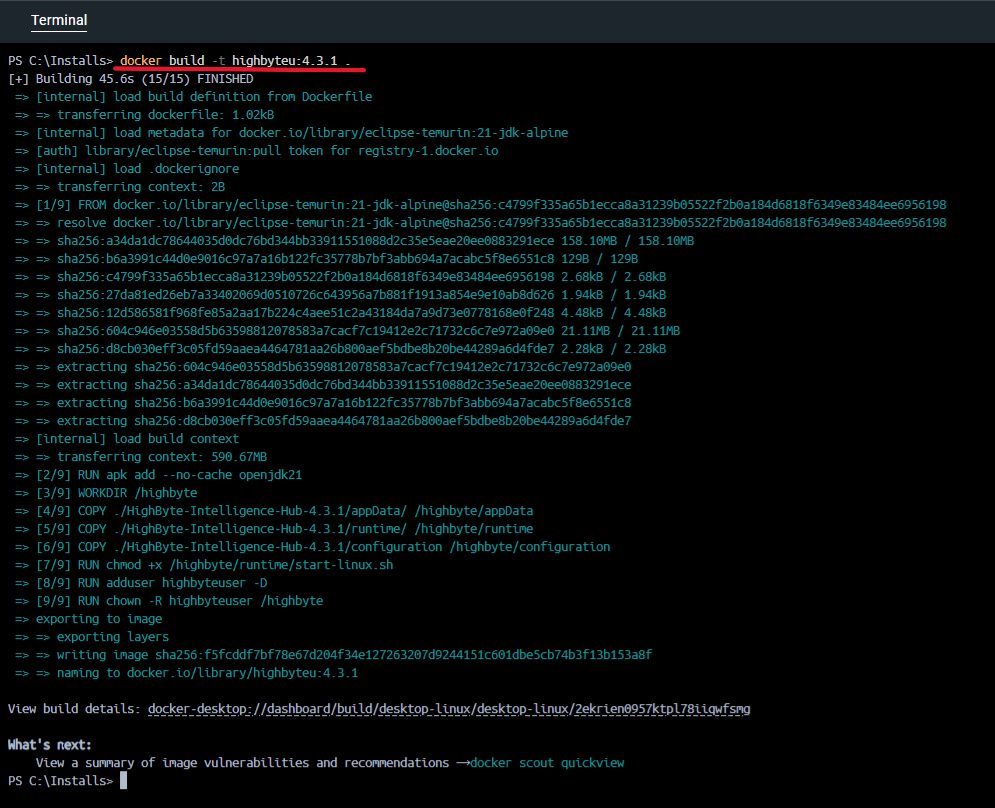
- In the same Powershell or Command Prompt, run the command
docker build -t highbyteu:4.3.1 .This may take a few minutes to complete.
- This command instructs Docker to use the Dockerfile to create the image.
- Docker will automatically download the required Eclipse-Temurin image necessary to start.
- The image will be named "highbyteu" for "highbyte unified" - this can be changed as desired
- The -t flag indicates that the image will be tagged with 4.3.1 which is the Intelligence Hub version being used here. This is a good convention and should generally be followed.
- The final '.' at the end means "use the resources here" to build the image. This is where we stored the
Dockerfile and the downloaded Intelligence Hub files.
- This command instructs Docker to use the Dockerfile to create the image.
- Verify your image is available with the command
docker image
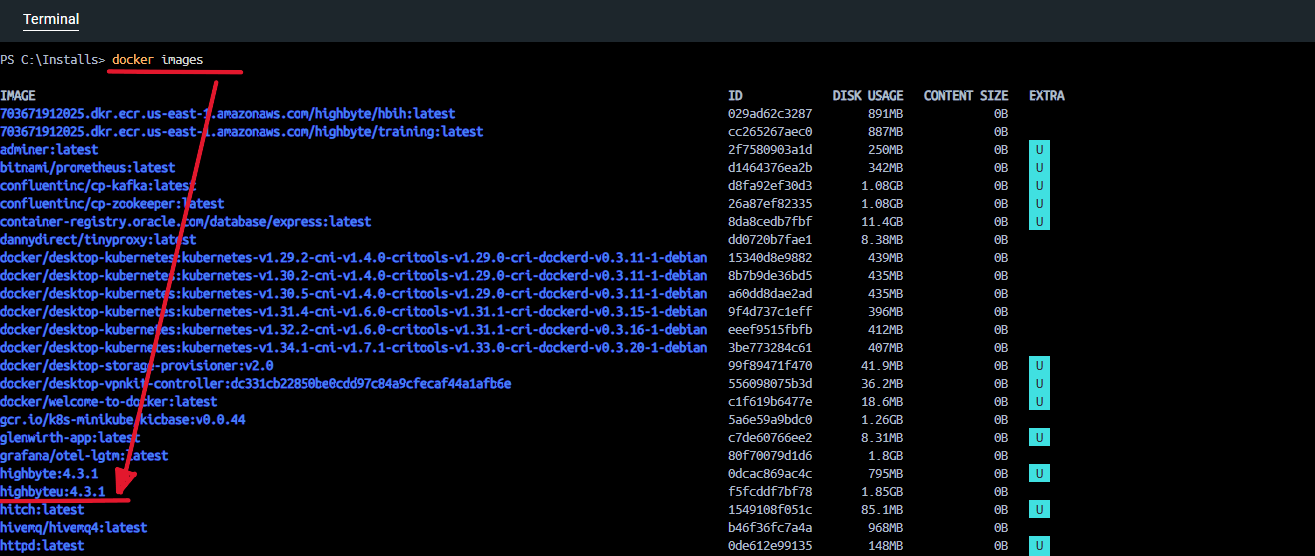
If all is successful, the image should now be ready for use.