What Does This Article Cover?
-
What is Templating?
-
Templating considerations
-
Designing a Template
- Connection Input
- Instance
- Flow
-
Tips & Tricks
-
Other related material
What is Templating?
Templating is a powerful feature of the Intelligence Hub and is typically one of the first introductions into advanced operation of the Intelligence Hub. It essentially applies a multi-patterned Component configuration (for how various data is mapped into the Intelligence Hub) across an unlimited range of assets. This applies to the upstream for how data is mapped into the various contextualization Component stages and is especially valuable when considering the following:
- Scaling out the programmed dataflows across large datasets or many assets.
- Automating the deployment of programmed dataflows by feeding dynamic references to the list of assets.
- Leveraging the schema patterns within the various data sources for how data is structured to map into the Intelligence Hub and nurture model reusability.
The role of templating is to design a “template” of how the relevant Component will generate separate and independent instances of that very Component (as if they were each statically defined). Each instance of the Component will be populated with values at carefully arranged placeholders to represent its intended asset.
This alleviates the work of manually creating separate Components for each asset that end up following a similar ingestion and naming pattern. Instead, a single Component can be managed for all assets that fall within the scope of the template design.
Templating is a feature that can be enabled in the following Intelligence Hub Components:
- Connection Input Component
- Instance Component
- Flow Component
Templating Considerations
Before diving into the design of a template, please consider the following:
- Assess the naming structures of the data sources and whether there are patterns/relations between the relevant assets, i.e., Machine001, Machine002, Machine003..., f3:3, f3:8, f3:13…
- Start small (≥3 elements), prove success and scale from there - do not template across the whole factory from the beginning.
- The name of the Instance Component typically represents its asset name at the target consumer. Each templated instance will be assigned a default unique name (“Component name + integer”) but can also be specified.
- The decision of where to template (at the Connection, Instance, or Flow) will depend on the use-case and maintainability. The following section goes over examples at a Connection.
Designing a Template:
Templating at a Connection Input Component - Mapping OPC tags
Alarms are typically set up to go off when certain thresholds or events are detected on the plant floor. This might be done to prevent injury to people, damage to machines, or defects in products. For monitoring these events, and capturing what is going on in the production environment when these flags are raised, the ability to group the tags you are interested in is made simple by templating at the Connection Component level. Templating at the Connection Input Component can be used to read in many tags across many assets with a single templated configuration. In the following example, templating is used to statically define the list of OPC-UA tags for pressure metrics along a production line to be brought into the Intelligence Hub.
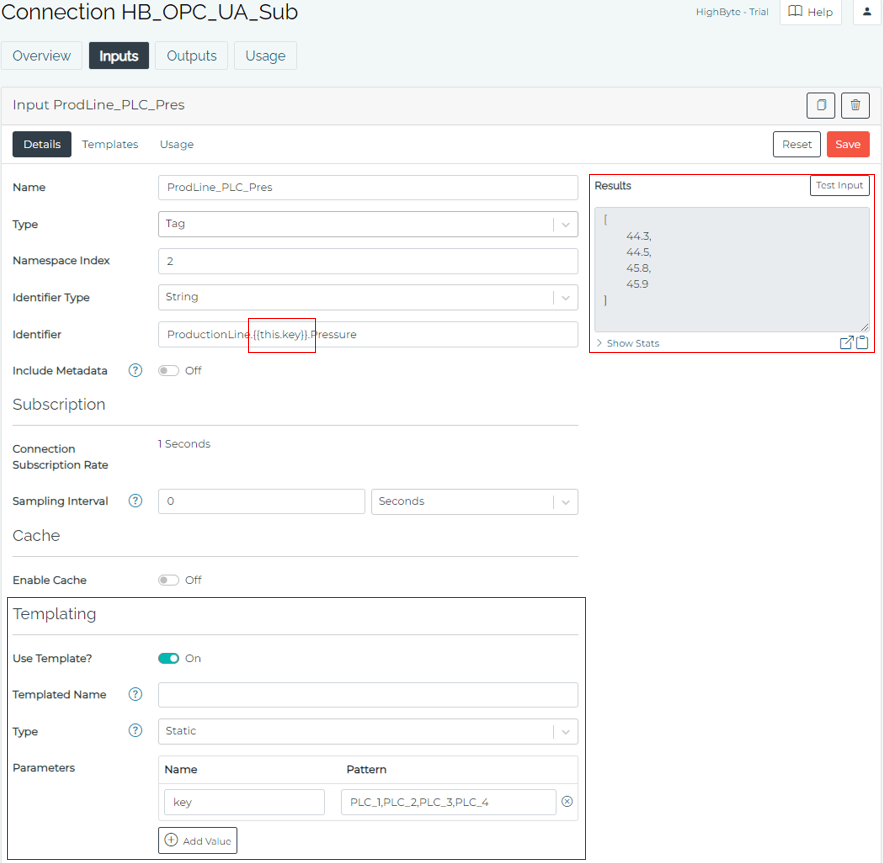
The following is the Details page for an OPA-UA Connection Input Component:
-
Toggle ON “Use Template?” option.
-
Declare and assign the values for the parameters.
- In this case, the parameter {{this.key}} is declared and assigned a pattern of “PLC_1”,”PLC_2”,”PLC_3”,”PLC_4”.
-
“Templated Name” field is optional and can be left blank.
- In the case it is left blank, the templated instances will append an incrementing integer to the Input name, i.e. “ProdLine_PLC_Pres1”, “ProdLine_PLC_Pres2”, “ProdLine_PLC_Pres3”, “ProdLine_PLC_Pres4”
-
For this connection, we are placing this {{this.key}} parameter reference in the Identifier field. The plan is to read in the OPC-UA tags for pressure values: “ProductionLine.PLC_1.Pressure”, “ProductionLine.PLC_2.Pressure”, “ProductionLine.PLC_3.Pressure”, and “ProductionLine.PLC_4.Pressure”.
- Note: the curly brace syntax is used as a special handle in the Intelligence Hub to reference Components, parameters, and attributes. The “this” in {{this.key}} points to the scope of the Component itself for where to find the parameter name, in this case the scope is the Connection Input ProdLine_PLC_Pres where the parameter "key" can be recognized.
-
The Results window from clicking “Test Input” shows an array of all the generated instances.
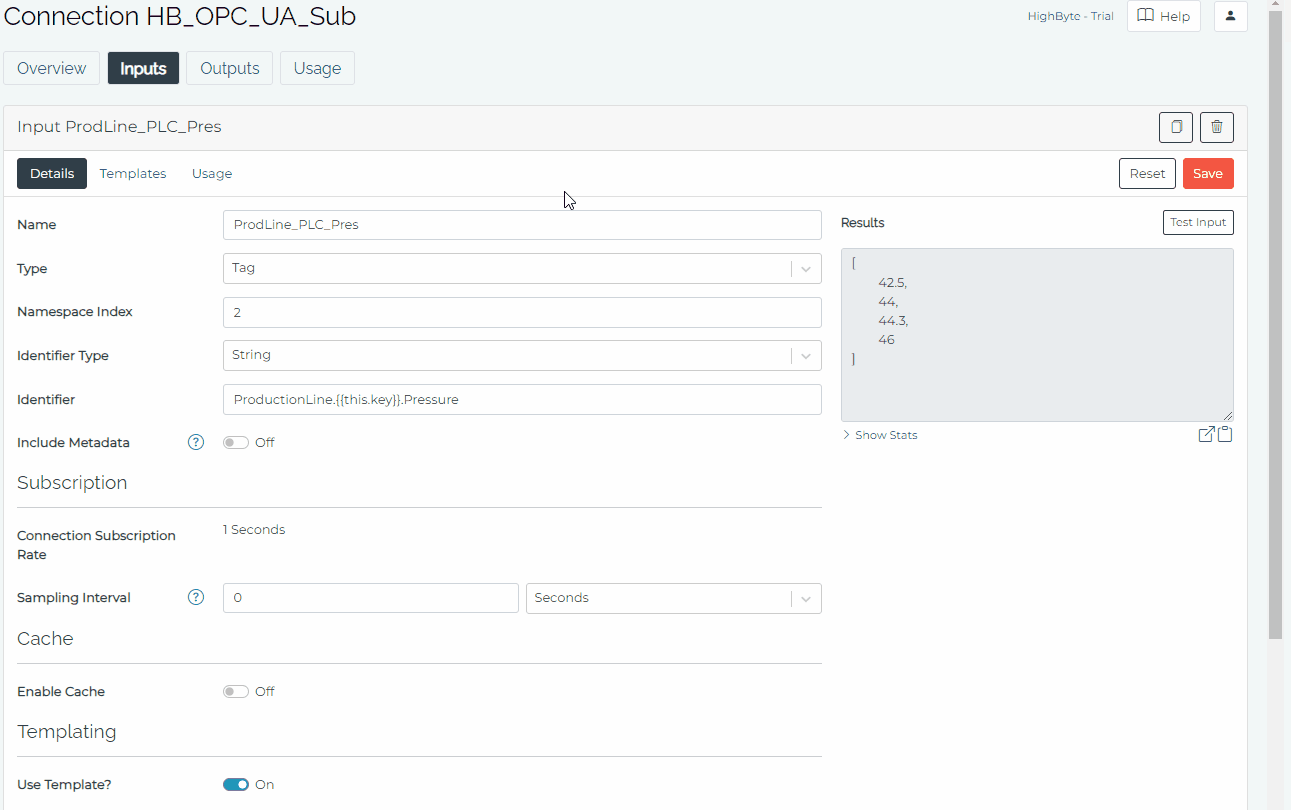
The following is the Templates page for the same OPC-UA Connection Input Component:
- This page shows the resolved states of the parameters. We see in the “Identifier” field, the {{this.key}} is replaced by “PLC_1”, “PLC_2”, “PLC_3”, “PLC_4” as was specified in the parameter field on the Details page to result in “ProductionLine.PLC_1.Pressure”, “ProductionLine.PLC_2.Pressure”, “ProductionLine.PLC_3.Pressure”, “ProductionLine.PLC_4.Pressure”.
- The name of the generated instance can be viewed in the top character field: “ProdLine_PLC_Pres1”, “ProdLine_PLC_Pres2”, “ProdLine_PLC_Pres3”, “ProdLine_PLC_Pres4”.
- The generated instances can be stepped through with the left/right arrow buttons.
- The “Test Input” window shows the actual payload that is generated by this specific templated instance.
Tips & Tricks
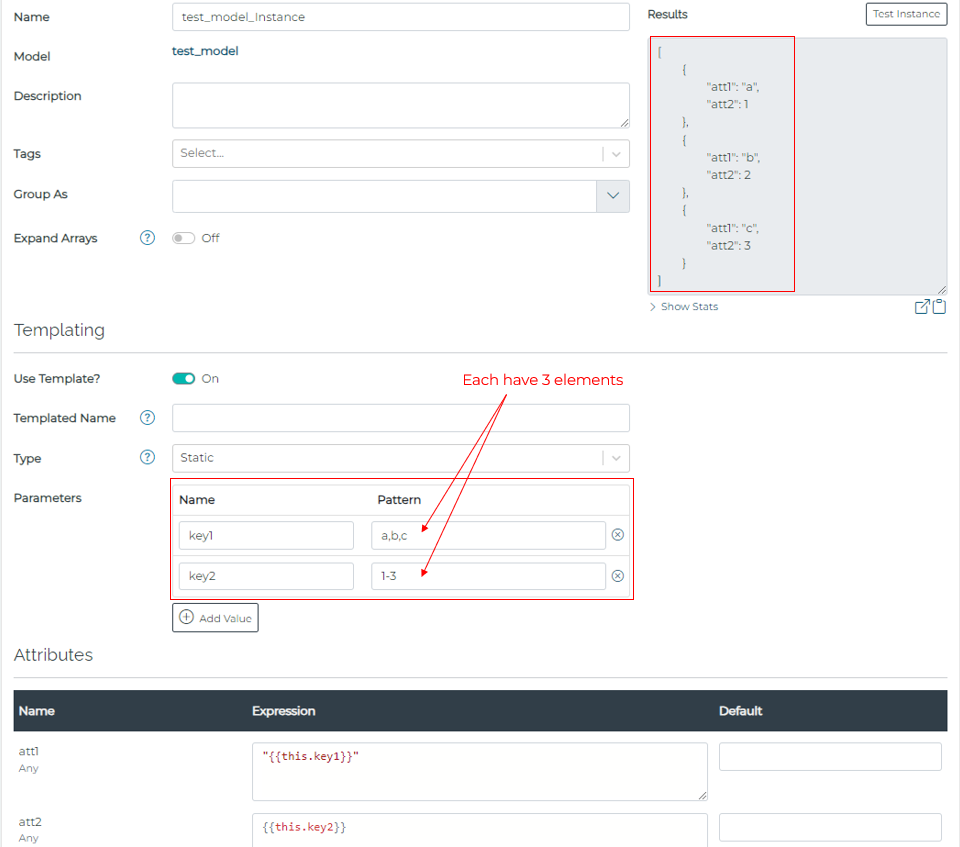
- When using more than 1 parameter, the parameters must have the same number of elements.
- The Templating engine iterates through all the parameters together from beginning to end of their patterns. The parameters will not generate combinations with each other, i.e. mix the 1st value of key1 with the 2nd value of key2.
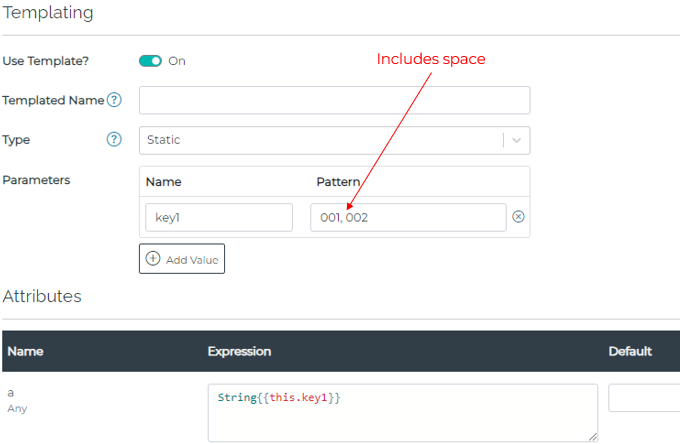
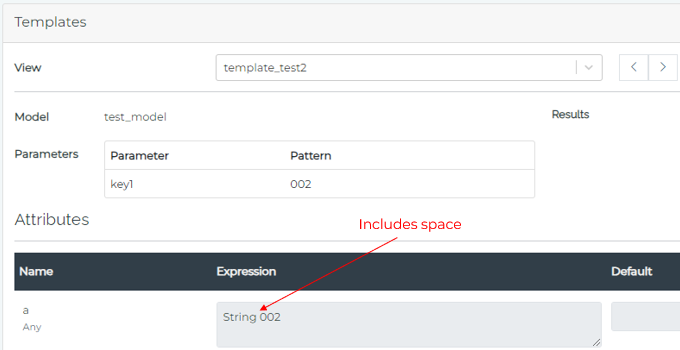
- The template parameter pattern field has strict comma delimitation, so if a space is added before or after the comma, it will become a part of the value. The following is an example of what happens when a space is added after a comma.
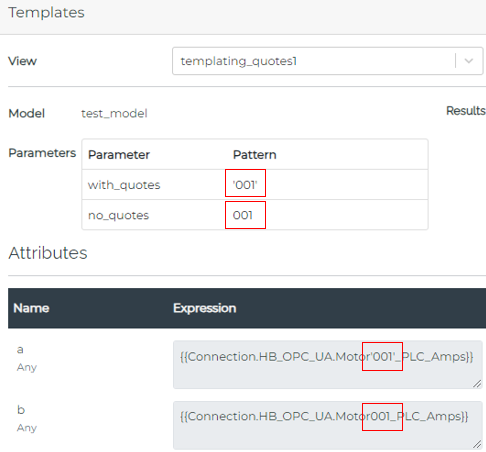
- Left padding a parameter value with 0’s will not automatically keep the same number of significant digits. For example, for the intent of keeping 3 significant in a range of 001-100 should instead be expressed as: 001-9,010-99,100
- Use single quotes for string values. a) When using parameters for populating names of Component references, having values in single-quotes will add double quotes around the resolved value in an expression field.